One quickly learns that the logistics involved in hiking the John Muir Trail are the hard part, not the walking. The walking is one foot in front of the other for over 200 miles along the highest passes and basins and meadows of the Sierra Nevada. No prob. But when to buy what and how to get from Seattle to Yosemite, and how to get back from Lone Pine to Seattle, and how to fly with a backpack, charge electronics, where to get fuel since you can’t fly with it, and permits, and reservations, and shuttles, and food, and who to call when, emergency contacts, pairing the InReach Mini to our phones, getting walkie-talkies, repackaging sunscreen and food, watching weather trends obsessively? These things will consume your every waking moment.
You must have some sort of organizational skills or you wouldn’t be considering doing this. Seems like many hiker/climber/mountaineer/backpacker types seem to love the research and the planning as much as the activity itself: maps, beta, trip reports, exchanging beta, we live for that stuff. So you probably have your own methods for staying on top of things but here’s what helped me keep it all together:
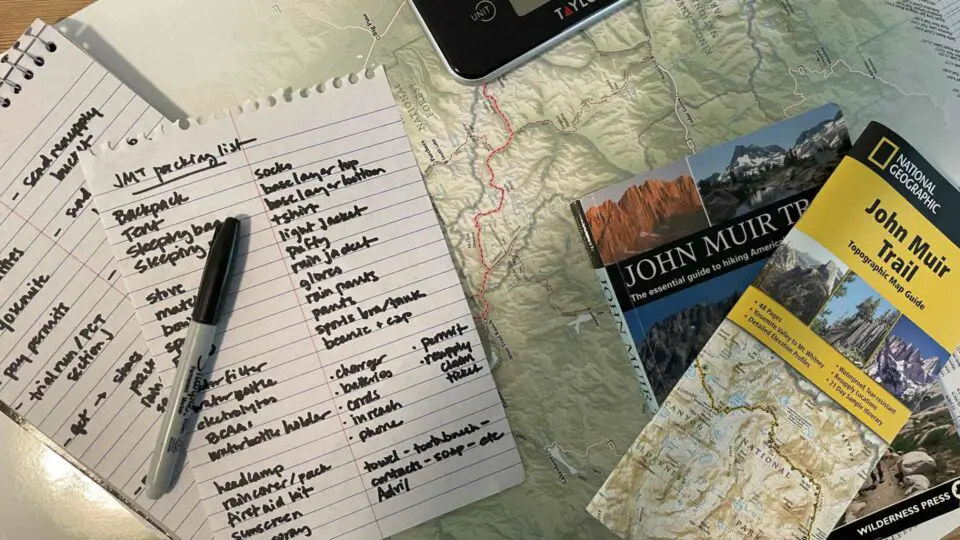
- Lists: I have a steno pad that I keep handy to jot down things as I think of them, compiling them into formal To Do lists every few days, divided by people to call, things to buy, errands to run, tasks to perform. Writing things down helps it all feel more manageable, versus when I try to just keep it in my brain. When I feel overwhelmed it’s usually because the thoughts are just floating around in there and it feels like there’s a million of them, when in reality once they’re on paper it’s like three things. I also kept a loose timeline of when to do what.
- Pre-made checklists: The internet is full of gear lists you can print out. Checking off boxes can greatly decrease the overwhelm and help you stay focused only on what you need to get, plus I was surprised at how much stuff I already had.
- Important: Get Elizabeth Wenk’s book, John Muir Trail: The Essential Guide To Hiking America’s Most Famous Trail. I also grabbed a large laminated map of the whole trail just to stare at and get familiar with all the names of things, as well as the National Geographic map booklet that will be coming with on the trail and has great elevation profiles and mileage breakdowns for easy planning on the fly.
- A work space: One of those big folding tables, or a huge desk that can be cleared off would be perfect; I used the basement workbench, but just any large flat surface (bye, dining room table) will do. For repacking food, I had baggies in two sizes, a scale, a notebook, the bear canister, our itinerary, and growing piles of food. I didn’t do my food shopping all at once, I grabbed bits here and there. I set out 13 sheets of paper and wrote the date on each with a big Day One, Day Two, etc in sharpie, and then started making piles on each page. It helped me to see things like only needing dinner and a snack on day one, and how to divide the resupply day food, what time we might get there, and what we’ll eat when we open our buckets. It also helped to look at the itinerary and add an extra snack for the higher mileage days.
- Once I got the scale, I went deep down the rabbit hole of UL backpacking. I looked at gear and strategies, and found the best website: LighterPack.com. You enter each item of gear and its weight and it keeps a running total for you, converted to a pounds.ounces format.
- Set aside an hour or two every few days and pack and repack your backpack. Walk around with it on. Try different configurations.
- Go on a short trip if you can, a little dress rehearsal. We did Section J of the Pacific Crest Trail in July and the lessons learned were invaluable and could not have been learned in any other way. We had to really feel the impact of the weight of our heavy packs, how much they slowed us down and changed our daily distance calculations. We had to find the places where our packs rubbed and discover that we could roll up gloves to pad the shoulder straps. We found out that the cheap Home Depot duct tape worked better than the fancy orange stuff from REI when it came to taping sweaty dirty blistered heels, and hipbones rubbed raw by the combination of pants with belt loops and a pack with a low hip belt. It inspired us to make huge renovations to our gear and food: anything to reduce weight, even if by a few ounces. It made the phrase “I’ll bring it just in case” sound like the worst idea in the world. When in doubt, leave it out! Every ounce counts! We learned all the UL slogans and stopped carrying four pairs of socks, or multiple tank tops. SmartWater bottle over Nalgene. The moment I crossed the line was when I cut my Thermarest Z-Lite into two pieces, taking only enough padding for my torso, shoulders to upper thigh. I will use my clothes as a pillow and put my emptyish pack under my lower legs if it’s particularly cold. Anyway, go away for a weekend, and if you can’t do that, go on a few of the longest day hikes you can come up with and make sure your pack is weighted to about 30-35 pounds.
- Finally, I used a small dishpan and threw random things in it that I had to deal with before leaving, everything from batteries that need to charge to the claim slip for the resupply bucket to the pouch of odds and ends that can’t be packed till last minute.
Writing out all the important things on one sheet of paper for your emergency contacts is a good thing to do during this time. Write down flight numbers and times, any hotel info, start and end dates, and hotel, rental car, or camping info for the days before and after your trek. Leave them phone numbers of everyone in your party and info on how to track you via your satellite device.
Ultimately you’ll find your own systems; it’s not about what those systems are, it’s the act of having them in place that’s important. You might use boxes, or sticky notes, index cards, or a big whiteboard. But however you do it, keeping your travel, food, gear, permits and itinerary organized will help you enjoy your trip so much more than if you go into this scattered and wondering if you’re forgetting something. The reward you get on the trail for putting in the effort at home is the gift of being fully present for this.
And remember, there’s a reason they say 4-6 months of planning is to be expected. There are many layers to this endeavor, each hinging on the others, all of it fitting together to culminate in us stepping off the shuttle bus and onto the trail. It’s complex, and it’s all important. Pull out your old college coursework tricks and how you stayed organized then. Be that serious about this. You’ll thank yourself later.
Wendy Harrington is a California native who has lived in a small town at the foothills of the Cascade Mountains in Washington state since 2001. Her love of trail running and peakbagging has led her to summit all five Washington volcanoes, climb to the high points of three states, and put nearly a thousand miles a year on her boots. Her loves include ridgelines, saddles, granite, one-day pushes on big mountains, anything volcanic, long solo days, and objectives that push limits and test endurance.
